Well yes here we go, I'm in the game, marking my leave, so forth.
Still finalizing what I'm going to do. Probably an interior shot all things considered. Since I'm looking rather forlornly down my empty smarties tube I think I might do a spaceship style launch tunnel.
In the meantime let me shamelessly plug some music I did last month. Call it the "on hold tune"
Not the November MMC, Hawk Rebuild
-
Steve

- Master Chief Petty Officer
- Posts: 394
- Joined: 29 Jun 2009, 10:20
- Type the number ten into the box: 0
- Location: Hiding (Like a ninja)
Not the November MMC, Hawk Rebuild
Last edited by Steve on 25 Nov 2014, 23:06, edited 1 time in total.

Re: November MMC, Tubes o' doom
Cool. Looking forward to it.
Nice music too. What exactly did you do with the music?
Nice music too. What exactly did you do with the music?
-
Steve
- Master Chief Petty Officer
- Posts: 394
- Joined: 29 Jun 2009, 10:20
- Type the number ten into the box: 0
- Location: Hiding (Like a ninja)
Re: November MMC, Tubes o' doom
Hey man how's it going C=
The original song is this one here:
Main changes to progression were the introduction and the instrumental bit in the middle. I had access to the isolated vocal track so I got to completely redo the instruments and the chords.
Other projects have dragged me away (as usual) so I'll probably start work on them tomorrow.
I may need to drag up my old mega-thread of WIPs for them...
-
Steve
- Master Chief Petty Officer
- Posts: 394
- Joined: 29 Jun 2009, 10:20
- Type the number ten into the box: 0
- Location: Hiding (Like a ninja)
Not the November MMC, Hawk Rebuild
Okay then, so actually I'm gonna need to back out of MMC to focus on a separate 3D project so I'll hijack my own thread
Yes
As title now says, I'm in the process of rebuilding the Hawk model, it's been 4 years since my last serious build. It's about time to give the hawk a bit of a reboot no?
Jules, the original concept artist has been a real gentleman, since I've absolutely ripped the design to pieces and put it back together, but hopefully it's going to be bigger and better and 1000% cooler. As a reminder, the original hawk mesh was as follows, cleaned up and textured by the amazing Madmouse:
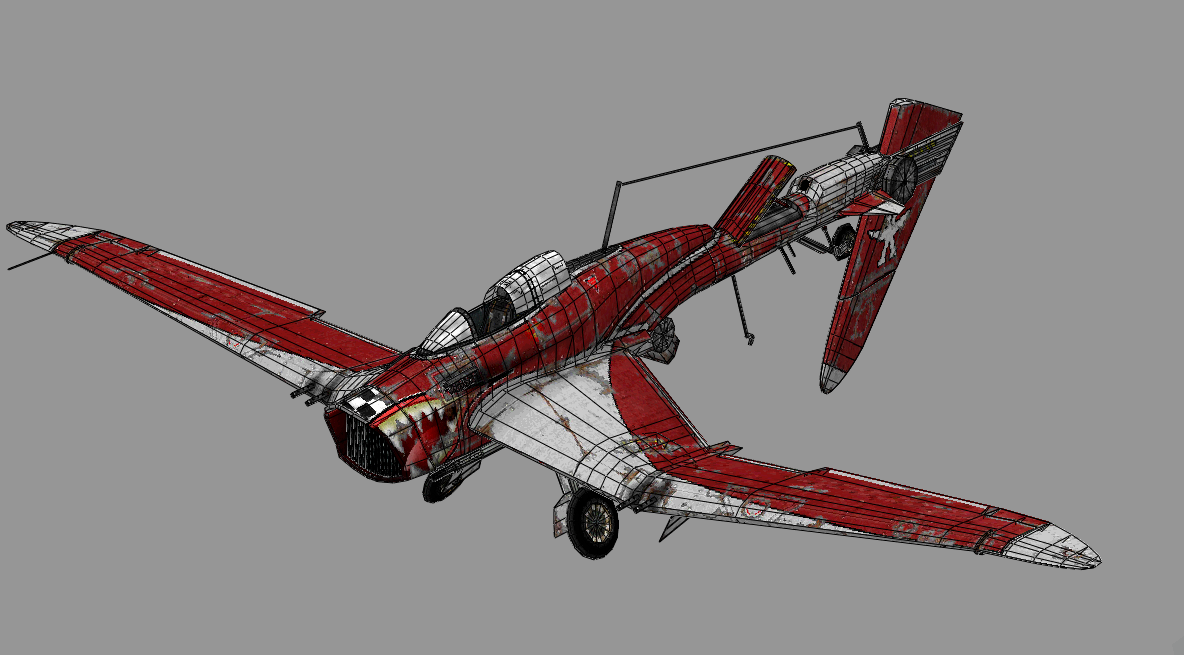

The target for this new model is ~8k polys, though I'm told I can probably go double that if I ever get the urge of slinging it into a games engine.
---------------------------------------------------------------------------------------------------------------
A list then, of all things wrong with the original design:
- No horizontal tail, the aircraft wouldn't be controllable
- Vertical fin had to move back and rotate 180 degrees to allow for landing, that's insanely daft
- The engine nozzle was square
- The engine nozzle swiveling downwards when landing wouldn't give the plane more lift, just make it tip forwards
- Pointless back 'hump' and inlet exhaust behind the airbrake
- Landing gear have such a high camber and no locking/extension mechanisms
- Pointless exhaust pipes by the cockpit
The grill at the front is also not practical, ideally the mouth should be circular and smaller for the type of engine that would be fitted and have none of those vertical vanes because they can get ingested and just interrupt the airstream. But it's part of the Hawk's look, so it stays and I work around it.
Since the Hawk is designed for a sky base type environment, that makes it by default a high altitude aircraft, since it will never start at sea level, so that justifies the long slender wings and larger air intakes. But it must also be a carrier based aircraft at the same time, so it needs launch/trap hooks, strong, sensible landing gear and big flaps.
Part of the 'lore' in the environment the hawk is built around is that any equipment, radios, (primitive) radar, active altimeters and other computer equipment are big, heavy and need a lot of cooling.
------------------------------------------------------------------------------------------------------
So, we had a brief discussion and the first thing to fix was the wacky rear end. We agreed that generally anything ahead of the rearmost cockpit frame was 'fine', the tail tail section needed serious work, and the rest would come together with the details. I made a brief concept of a refined version:
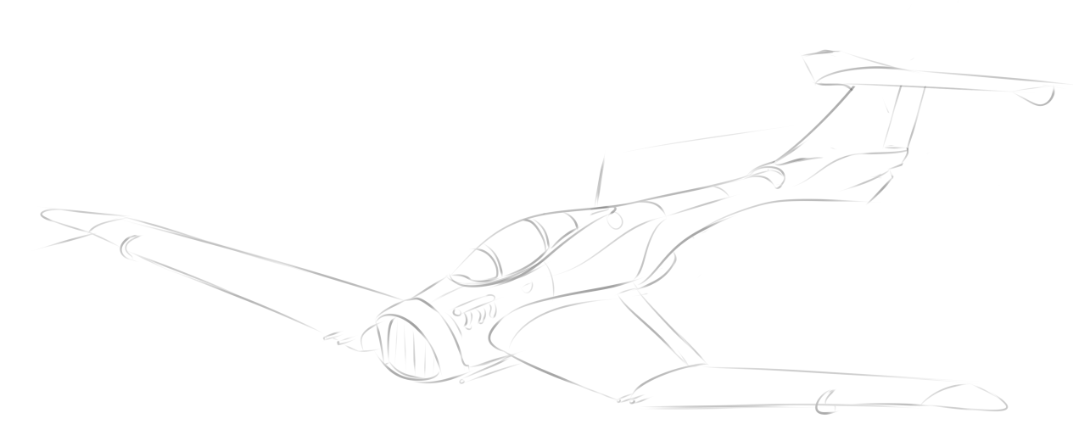
We deemed that too modernised and the T-Tail arrangement just didn't fit. Jules' suggestions were:
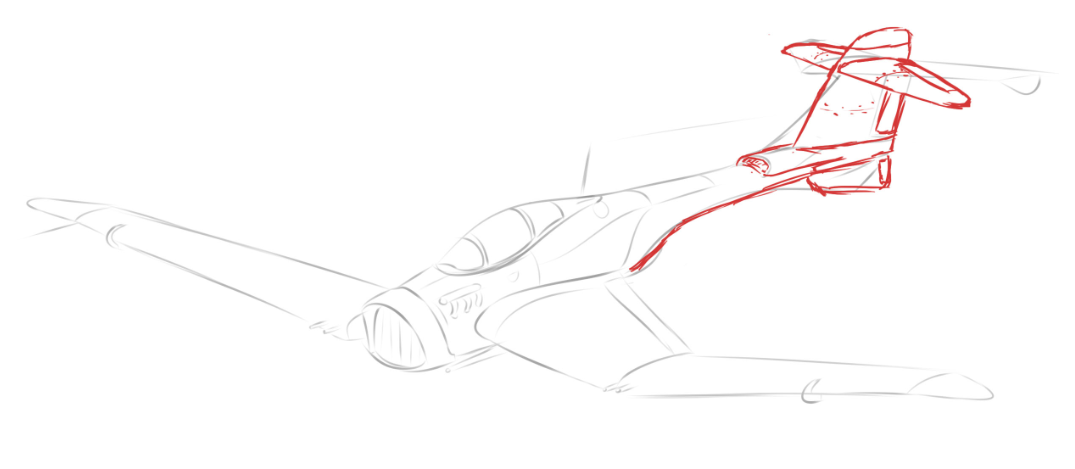
We even had a brief flirt with the idea of a H-Tail, good from a redundancy and tail effectiveness perspective, but quite heavy. Eventually we just decided to see how it goes
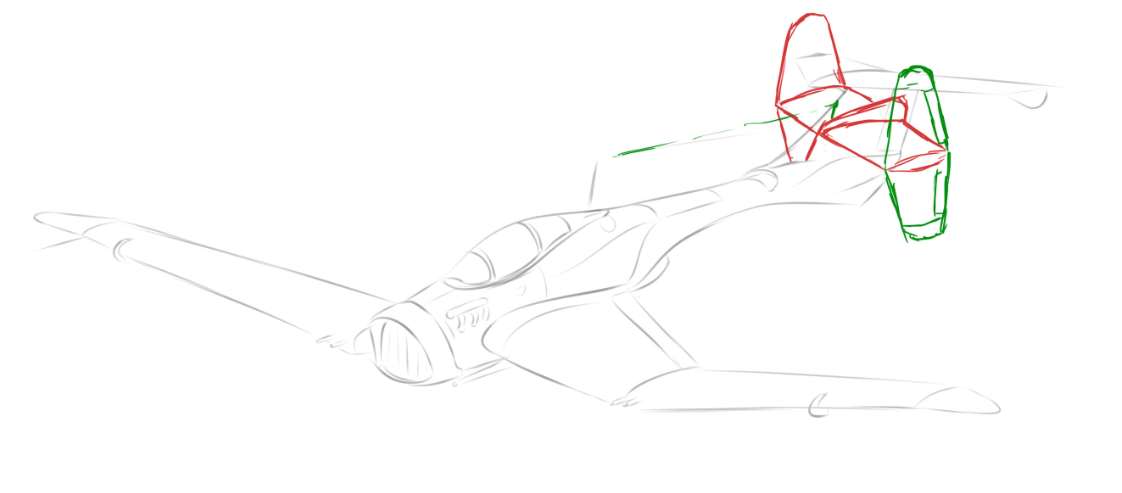
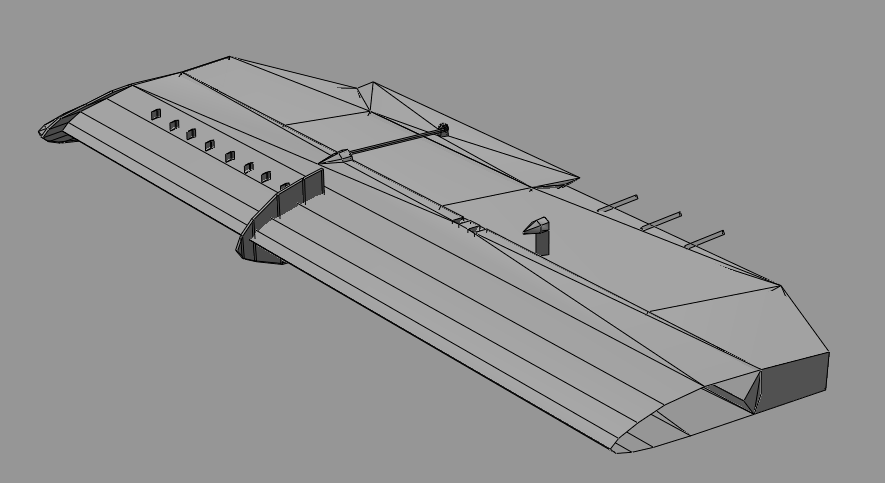
So I cut the original model to pieces, and was left with the starting blocks for this new design:
Yes
As title now says, I'm in the process of rebuilding the Hawk model, it's been 4 years since my last serious build. It's about time to give the hawk a bit of a reboot no?
Jules, the original concept artist has been a real gentleman, since I've absolutely ripped the design to pieces and put it back together, but hopefully it's going to be bigger and better and 1000% cooler. As a reminder, the original hawk mesh was as follows, cleaned up and textured by the amazing Madmouse:
The target for this new model is ~8k polys, though I'm told I can probably go double that if I ever get the urge of slinging it into a games engine.
---------------------------------------------------------------------------------------------------------------
A list then, of all things wrong with the original design:
- No horizontal tail, the aircraft wouldn't be controllable
- Vertical fin had to move back and rotate 180 degrees to allow for landing, that's insanely daft
- The engine nozzle was square
- The engine nozzle swiveling downwards when landing wouldn't give the plane more lift, just make it tip forwards
- Pointless back 'hump' and inlet exhaust behind the airbrake
- Landing gear have such a high camber and no locking/extension mechanisms
- Pointless exhaust pipes by the cockpit
The grill at the front is also not practical, ideally the mouth should be circular and smaller for the type of engine that would be fitted and have none of those vertical vanes because they can get ingested and just interrupt the airstream. But it's part of the Hawk's look, so it stays and I work around it.
Since the Hawk is designed for a sky base type environment, that makes it by default a high altitude aircraft, since it will never start at sea level, so that justifies the long slender wings and larger air intakes. But it must also be a carrier based aircraft at the same time, so it needs launch/trap hooks, strong, sensible landing gear and big flaps.
Part of the 'lore' in the environment the hawk is built around is that any equipment, radios, (primitive) radar, active altimeters and other computer equipment are big, heavy and need a lot of cooling.
------------------------------------------------------------------------------------------------------
So, we had a brief discussion and the first thing to fix was the wacky rear end. We agreed that generally anything ahead of the rearmost cockpit frame was 'fine', the tail tail section needed serious work, and the rest would come together with the details. I made a brief concept of a refined version:
We deemed that too modernised and the T-Tail arrangement just didn't fit. Jules' suggestions were:
We even had a brief flirt with the idea of a H-Tail, good from a redundancy and tail effectiveness perspective, but quite heavy. Eventually we just decided to see how it goes
So I cut the original model to pieces, and was left with the starting blocks for this new design:
Last edited by Steve on 28 Nov 2014, 17:00, edited 2 times in total.
-
Steve
- Master Chief Petty Officer
- Posts: 394
- Joined: 29 Jun 2009, 10:20
- Type the number ten into the box: 0
- Location: Hiding (Like a ninja)
Re: Not the November MMC, Hawk Rebuild
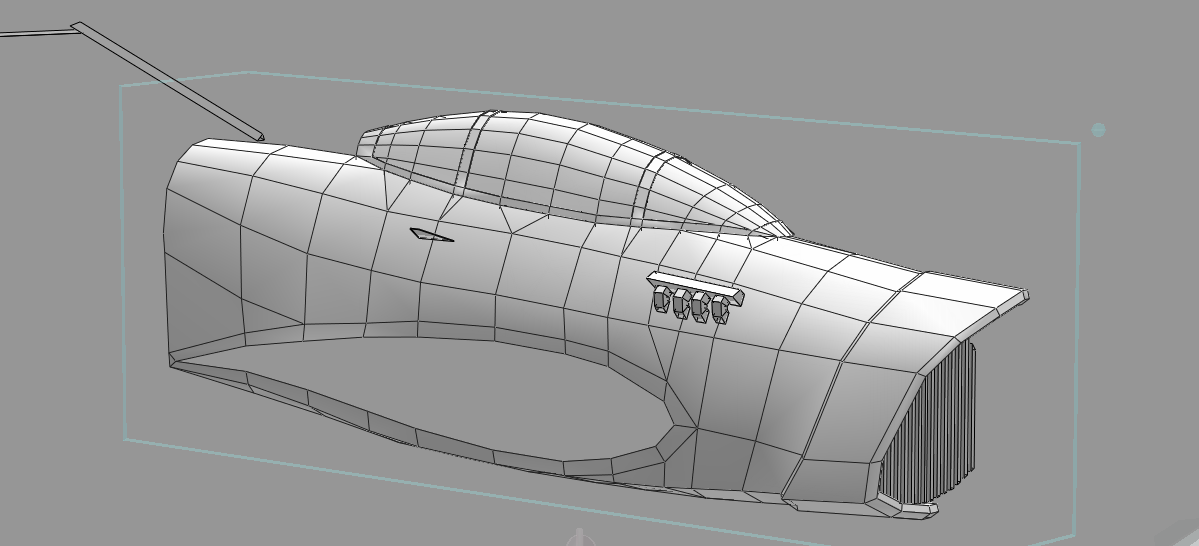
With that, I looked at the configuration itself. And oh boy, problems problems problems...
I cleaned up and reduced the polys round the cockpit area and got rid of the useless hump. While I was at it I modelled the rear half of the fuselage. All in about 1.3k polys:
----------------------------------------------------------------------------------------
Protip: If you ever design a plane, Always make the wheels top priority, they can absolutely paint your design into a corner. It really ruins your day.
Like before, since the fuselage forces the landing gear to be wing-mounted, it must be a taildragger. Nearly all jet aircraft have 'tricycle' style landing gear because they're easier to control on the ground, it keeps the hot exhaust from bouncing back up into the tail, and since they are usually mounted much further aft than a propeller engine, makes room for nose landing gear. Trying to change that will change the whole aircraft (see aforementioned top tip) so it remains a tail dragger.
The original Hawk design had a gull shaped wing like the old F4U fighters and Stuka Bombers:

Originally Jules designed them because he thought they looked cool and gave some sort of aerodynamic or performance advantage. I agree, the shape looks great on the hawk. But the gull wings were not used for any aerodynamic benefit, but because of the enormous engines that some aircraft were fitted with. They needed very long landing gear legs to keep the propeller and any bombs/droptanks from hitting the ground, and it was actually far more practical to make the landing gear shorter but make the wing droop in the middle. It's with pure luck that I find that was very much needed for the hawk or the wheels would be way too long and wouldn't fit!
----------------------------------------------------------------------------------------------
The second issue was the engine. Where do I put it? And what do I do with the tail and cockpit? Since the main intake is right at the front, the engine and duct pass under the cockpit. I kind of already assumed the aircraft would be slightly worse in performance than the F-86 Sabre aircraft which had a 3.7m long, 0.8m max diameter (minus starter/gearbox) engine. Gave it a try, and with some jiggery pokery, it fit! I needed to add a little hump on the underside of the fuselage.
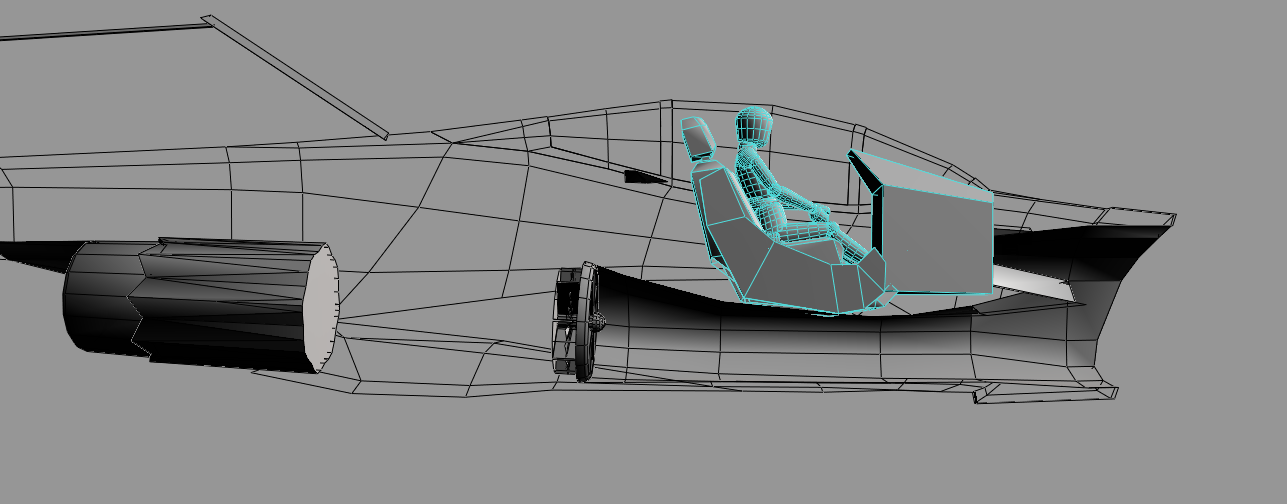
JUST. Don't worry about the inlet duct narrowing, that's not a problem, and is actually a necessity in higher speed aircraft.
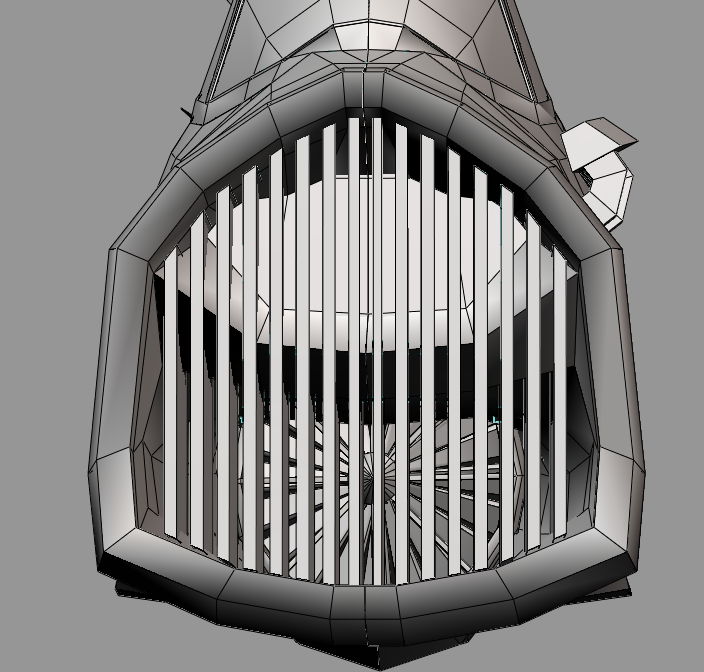
Last time I didn't allow the viewer to see down the inlet but this time I want them to be able to. I don't know the exact airflow requirements this particular engine had so I can't calculate the size accurately, but on average you need your intake area to be 20% larger than the front fan diameter, which left me with a lot of extra grill...
So I split it. Top half feeds to the cockpit and computer systems, bottom half feeds to the engine. Tempted when texturing comes around to make it so you can see glowing blue fire in between the fan gaps....
------------------------------------------------------------------------------------------------
I cleaned up and reduced the polys round the cockpit area and got rid of the useless hump. While I was at it I modelled the rear half of the fuselage. All in about 1.3k polys:
----------------------------------------------------------------------------------------
Protip: If you ever design a plane, Always make the wheels top priority, they can absolutely paint your design into a corner. It really ruins your day.
Like before, since the fuselage forces the landing gear to be wing-mounted, it must be a taildragger. Nearly all jet aircraft have 'tricycle' style landing gear because they're easier to control on the ground, it keeps the hot exhaust from bouncing back up into the tail, and since they are usually mounted much further aft than a propeller engine, makes room for nose landing gear. Trying to change that will change the whole aircraft (see aforementioned top tip) so it remains a tail dragger.
The original Hawk design had a gull shaped wing like the old F4U fighters and Stuka Bombers:
Originally Jules designed them because he thought they looked cool and gave some sort of aerodynamic or performance advantage. I agree, the shape looks great on the hawk. But the gull wings were not used for any aerodynamic benefit, but because of the enormous engines that some aircraft were fitted with. They needed very long landing gear legs to keep the propeller and any bombs/droptanks from hitting the ground, and it was actually far more practical to make the landing gear shorter but make the wing droop in the middle. It's with pure luck that I find that was very much needed for the hawk or the wheels would be way too long and wouldn't fit!
----------------------------------------------------------------------------------------------
The second issue was the engine. Where do I put it? And what do I do with the tail and cockpit? Since the main intake is right at the front, the engine and duct pass under the cockpit. I kind of already assumed the aircraft would be slightly worse in performance than the F-86 Sabre aircraft which had a 3.7m long, 0.8m max diameter (minus starter/gearbox) engine. Gave it a try, and with some jiggery pokery, it fit! I needed to add a little hump on the underside of the fuselage.
JUST. Don't worry about the inlet duct narrowing, that's not a problem, and is actually a necessity in higher speed aircraft.
Last time I didn't allow the viewer to see down the inlet but this time I want them to be able to. I don't know the exact airflow requirements this particular engine had so I can't calculate the size accurately, but on average you need your intake area to be 20% larger than the front fan diameter, which left me with a lot of extra grill...
So I split it. Top half feeds to the cockpit and computer systems, bottom half feeds to the engine. Tempted when texturing comes around to make it so you can see glowing blue fire in between the fan gaps....
------------------------------------------------------------------------------------------------
-
Finis

- Captain
- Posts: 5262
- Joined: 21 May 2009, 18:26
- Type the number ten into the box: 0
- Location: North Venezuela or West Korea
- Contact:
Re: Not the November MMC, Hawk Rebuild
This is from Broken Skies?
Be cautious about messing up a great piece of art by applying real world knowledge or being concerned with stuff like whether it could really fly. Now if this is for a project with more realism great but if it is for an artistic style piece then the art, the look and feel, is everything and real world technical considerations are possibly even harmful.
Don't misunderstand, it looks cool so far and I'm sure it will be awesome. I'm just saying to consider your goals for an image, design, or model and what would help or hurt that. Art often is not about reality. Art that is about reality often doesn't use reality as its expression. From what I've seen of it in the forum, Broken Skies is art. Really. It is.
The more laws, the less justice. -- Marcus Tullius Cicero
-
Steve
- Master Chief Petty Officer
- Posts: 394
- Joined: 29 Jun 2009, 10:20
- Type the number ten into the box: 0
- Location: Hiding (Like a ninja)
Re: Not the November MMC, Hawk Rebuild
Well spotted. Not revamping the project, just remodelling the aircraft as if it were going in a game engine as an exercise.
The core Hawk shape remains as intact as possible. I recognise that if we were to follow real-world all the way then we'd just end up with very safe, compromised 'real world' designs.
But, if it looks bizarre, it probably looks bizarre for a reason. The engineering formulae have actually made the plane look right again when I was stumped as to what looked wrong.
As long as we're consistent with our 'rule breaking' and have enough credible details, that's good. Don't worry, Jules reigns me in at regular intervals! Devil's in the detail, the little changes I stress over that'll make this design "flyable" or "not flyable" are probably so minute no sane person will see the difference.
We really did need to change the tail section though...
-
Steve
- Master Chief Petty Officer
- Posts: 394
- Joined: 29 Jun 2009, 10:20
- Type the number ten into the box: 0
- Location: Hiding (Like a ninja)
Re: Not the November MMC, Hawk Rebuild
Okay, so configuration changes. Not drastic, but just enough to be awkward for me. As long as it wasn't going to change the fundamental look I wanted to prove that the aircraft was at least statically stable. For that its centre of gravity must be in front of the centre of lift so it naturally wants to drop its nose down.
It's an iterative process so I won't bore you guys with the full version.
Calculate wing geometry-> Check performance -> Check weight -> Check centre of gravity position -> Repeat
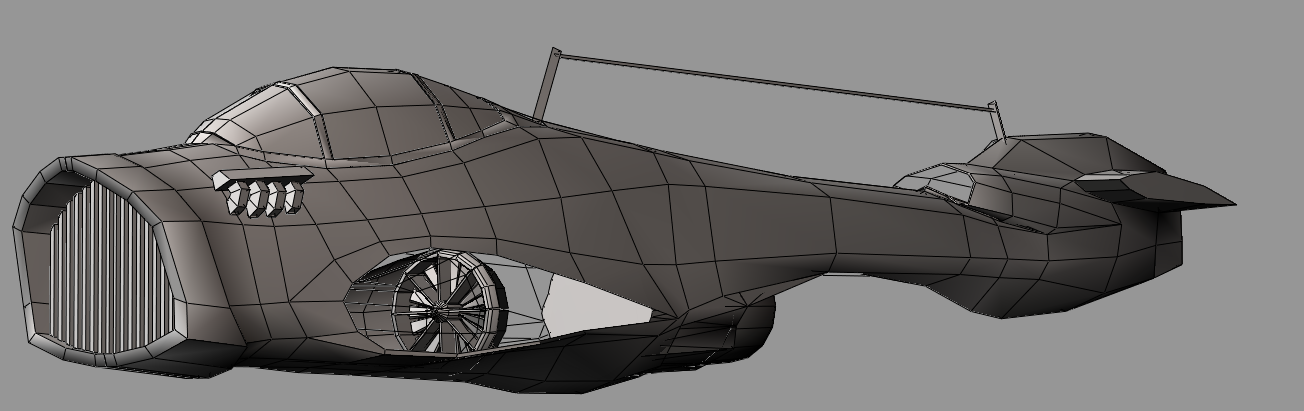
The wing shape stays exactly the same but for stability it needed to move backwards. It was just easier to move the rest of the aircraft around it because of the weird tail shape. Eventually, I got this:
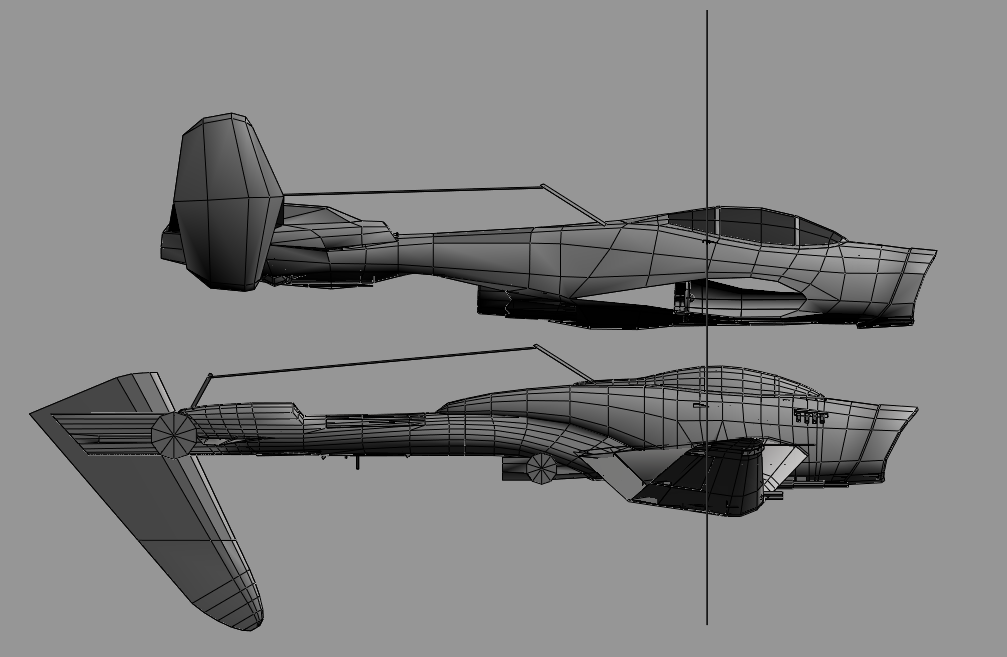
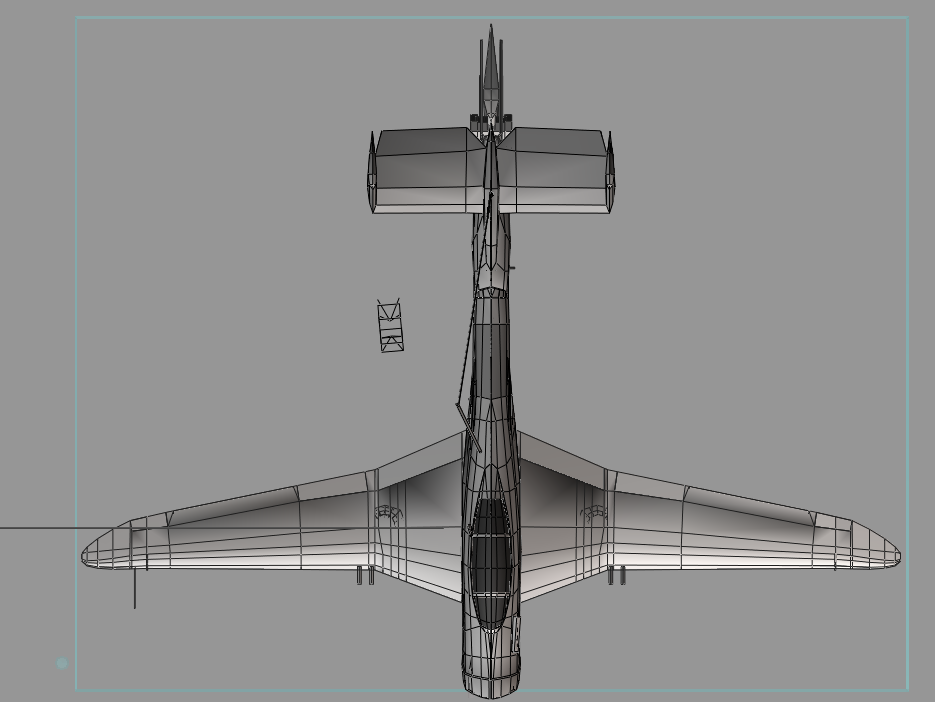
That black line is the centre of gravity position. The tail had to get a few meters shorter and I needed to extend the nose slightly.
The H-tail looked good, until I put the original wing shape on, then it looked rubbish.
So for now we decided to take away the vertical part of the "H" and see what looks good later on.
Boring bit over, time for some proper modelling!
It's an iterative process so I won't bore you guys with the full version.
Calculate wing geometry-> Check performance -> Check weight -> Check centre of gravity position -> Repeat
The wing shape stays exactly the same but for stability it needed to move backwards. It was just easier to move the rest of the aircraft around it because of the weird tail shape. Eventually, I got this:
That black line is the centre of gravity position. The tail had to get a few meters shorter and I needed to extend the nose slightly.
The H-tail looked good, until I put the original wing shape on, then it looked rubbish.
So for now we decided to take away the vertical part of the "H" and see what looks good later on.
Boring bit over, time for some proper modelling!
-
Steve
- Master Chief Petty Officer
- Posts: 394
- Joined: 29 Jun 2009, 10:20
- Type the number ten into the box: 0
- Location: Hiding (Like a ninja)
Re: Not the November MMC, Hawk Rebuild
Okay, so my next protip:
If you don't already, use the vertex snapping tool. Ye gods I never managed to get it to work until now, and it's an absolute time/life saver
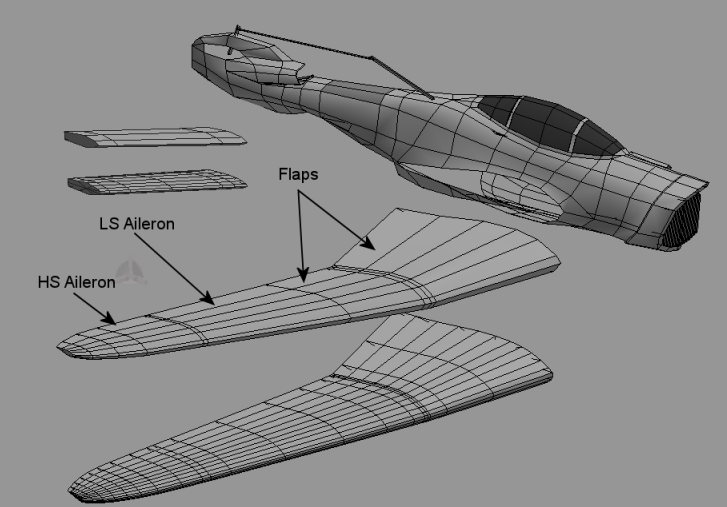
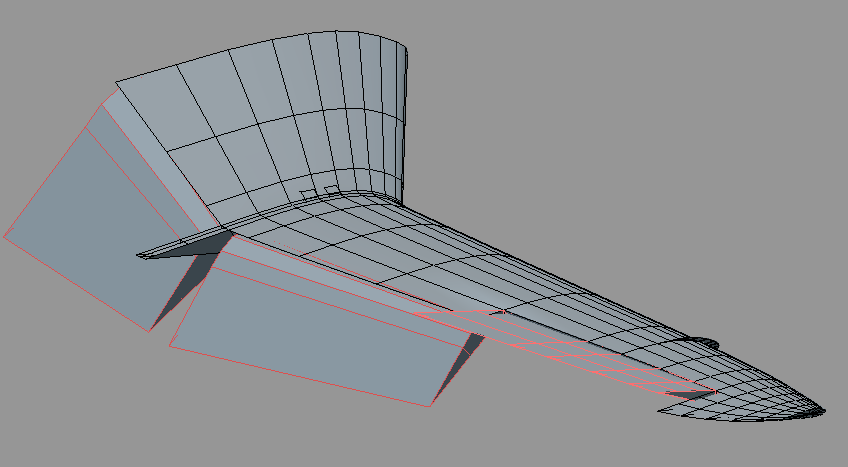
I split up the aircraft into main wing, fuselage, horizontal tail and Vertical tail (wherever that's going to go), deleted the faces at the intersections so the join is sharp and then Sub D'd the bits I was working on. The random splits down the main wing control mesh are so I can separate the control surfaces later.
Started with the Horizontal tail. Extracted the mesh, simplified it, split it again to get the control surface then added the nose of it. Snapped its axis to the upper forward edge, orientated the Z axis down the hinge line and then set its rotation to 0.
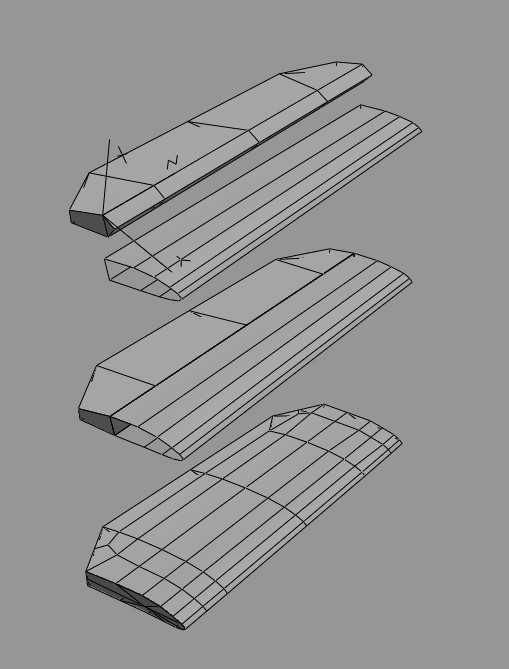
The details, easy but time consuming because of the cleanup work involved:
Wing fences and vanes:
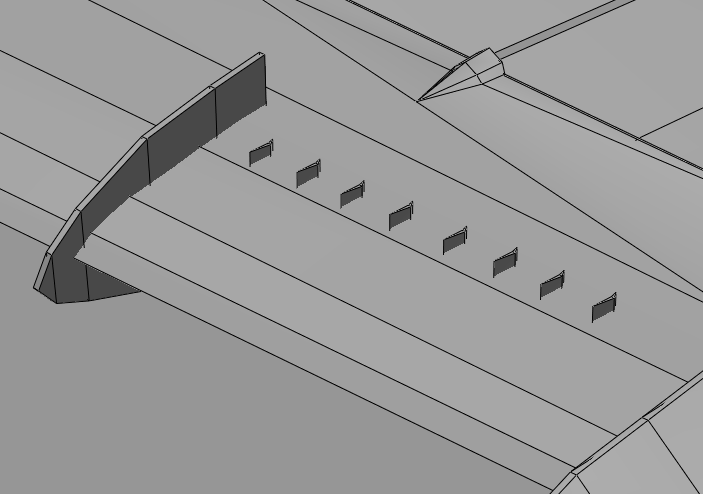
Mass balances and control lines:
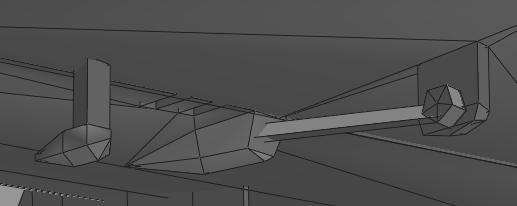
Most of the other details like the control line shrouds and the notches were done by making separate meshes and using boolean union tool, then getting rid of the nasty Ngons and random vertices.
The control lines are 'rigged' in two ways, the top mounted one is under a 'look at' constraint, where it looks at the main tail element's axis. The second one is actually not rigged and just rotates freely with the elevator.
Final model:
And for movement:
If you don't already, use the vertex snapping tool. Ye gods I never managed to get it to work until now, and it's an absolute time/life saver
I split up the aircraft into main wing, fuselage, horizontal tail and Vertical tail (wherever that's going to go), deleted the faces at the intersections so the join is sharp and then Sub D'd the bits I was working on. The random splits down the main wing control mesh are so I can separate the control surfaces later.
Started with the Horizontal tail. Extracted the mesh, simplified it, split it again to get the control surface then added the nose of it. Snapped its axis to the upper forward edge, orientated the Z axis down the hinge line and then set its rotation to 0.
The details, easy but time consuming because of the cleanup work involved:
Wing fences and vanes:
Mass balances and control lines:
Most of the other details like the control line shrouds and the notches were done by making separate meshes and using boolean union tool, then getting rid of the nasty Ngons and random vertices.
The control lines are 'rigged' in two ways, the top mounted one is under a 'look at' constraint, where it looks at the main tail element's axis. The second one is actually not rigged and just rotates freely with the elevator.
Final model:
And for movement:
-
Steve
- Master Chief Petty Officer
- Posts: 394
- Joined: 29 Jun 2009, 10:20
- Type the number ten into the box: 0
- Location: Hiding (Like a ninja)
Re: Not the November MMC, Hawk Rebuild
Okidokey, onto the main wing.
Much the same sort of routine as the tailplane. Split the mesh up, align the component axes and then added the noses of each element. The flaps need to extend both out and down so their rotation centre is actually below the wing skin, a couple of hinge models and fairings will be needed a bit later on
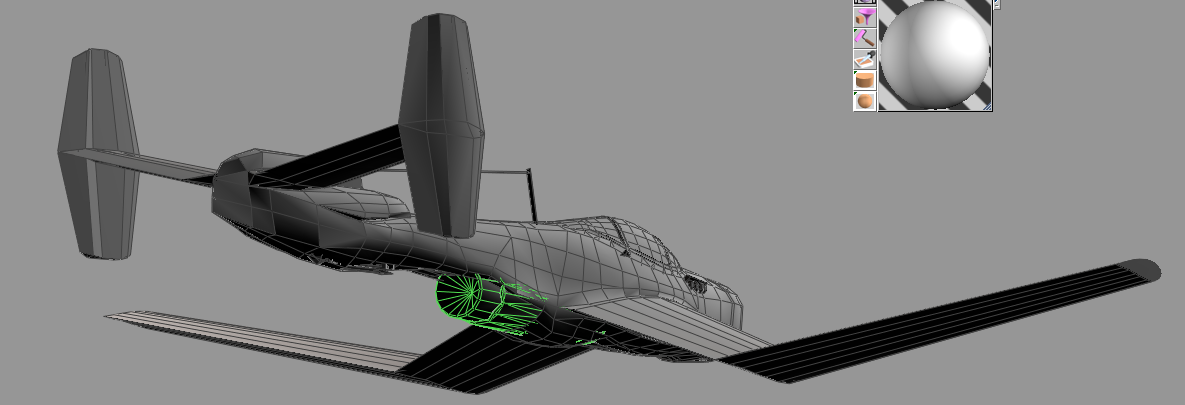
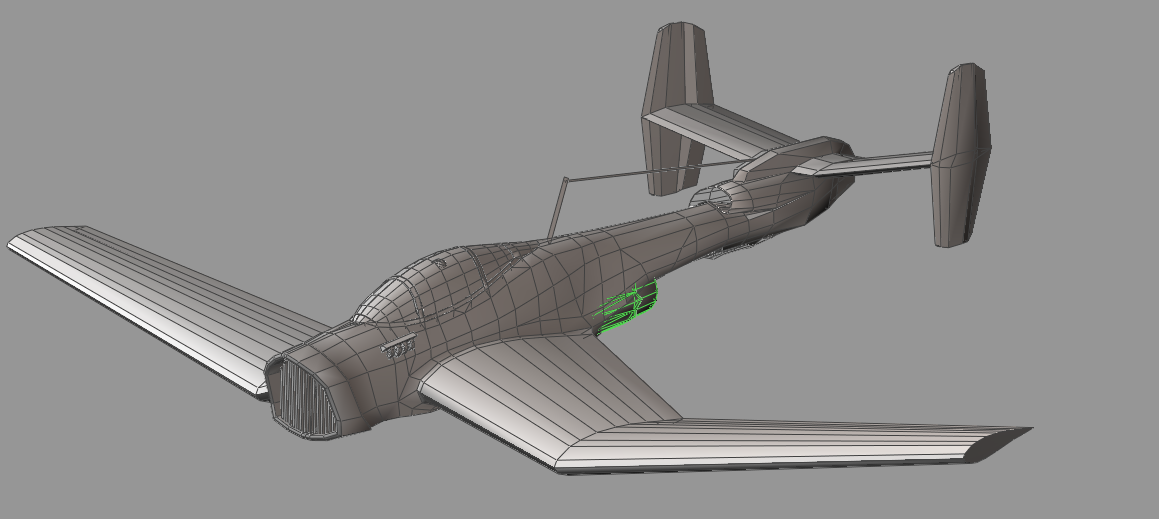
The major problem was actually storing the aircraft. The wingspan's 19m...it ain't going to fit in any sort of aircraft carrier without folding wings, so I played about.
Folding them straight up made more problems than it solved since the ceilings would have to be stupidly high. The other three options we had were back a la Hellcats and Hawkeyes. Doubled over a la Gannet, or criss cross a la Vikings...Naturally Jules and I went for the criss cross since to us, it looks the coolest, despite the fact it's going to mean asymmetric modelling. The mechanism itself is going to come last because I'll need to do a lot of symmetry work right up to the end:
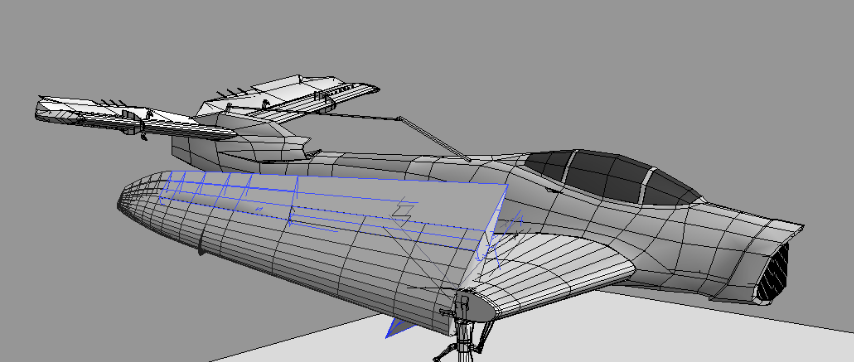
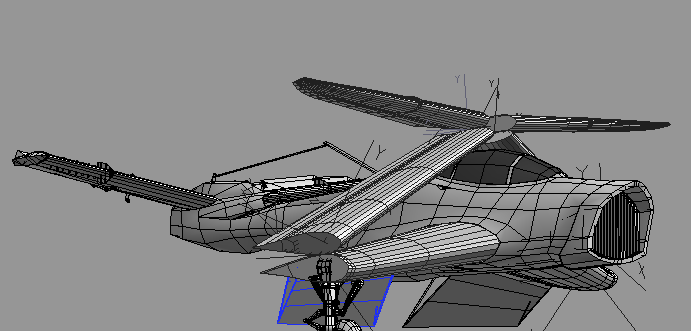
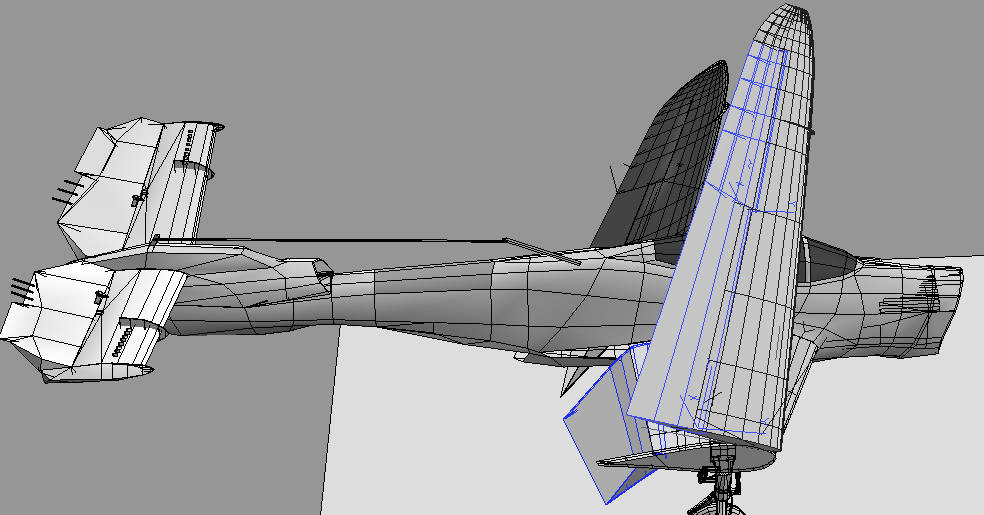
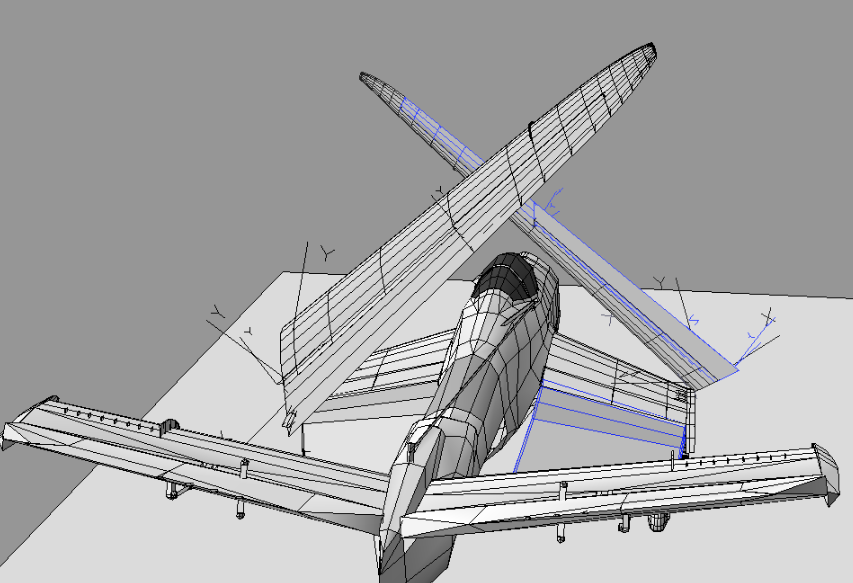
I got the criss cross by simply offsetting the starboard wing's rotation axis 8 degrees back, and the port wing's axis 8 degrees forwards. The backwards fold was just too much of a pain to get right without any part intersections
Next up, landing gear, my favourite bit so far
Much the same sort of routine as the tailplane. Split the mesh up, align the component axes and then added the noses of each element. The flaps need to extend both out and down so their rotation centre is actually below the wing skin, a couple of hinge models and fairings will be needed a bit later on
The major problem was actually storing the aircraft. The wingspan's 19m...it ain't going to fit in any sort of aircraft carrier without folding wings, so I played about.
Folding them straight up made more problems than it solved since the ceilings would have to be stupidly high. The other three options we had were back a la Hellcats and Hawkeyes. Doubled over a la Gannet, or criss cross a la Vikings...Naturally Jules and I went for the criss cross since to us, it looks the coolest, despite the fact it's going to mean asymmetric modelling. The mechanism itself is going to come last because I'll need to do a lot of symmetry work right up to the end:
I got the criss cross by simply offsetting the starboard wing's rotation axis 8 degrees back, and the port wing's axis 8 degrees forwards. The backwards fold was just too much of a pain to get right without any part intersections
Next up, landing gear, my favourite bit so far